
Monday, July 11, 2022

Thursday, June 30, 2022
Teeny Tiny Townie Bouquet

Another Stamping Bella adorable image. Blue and Yellow are always a gorgeous combination. Having
fun creating this card for a dear friend. Her favorite color is blue.
Copics:
Skin - E11, E000 E00
Yellow - Y11, Y13, Y15
Blue - B60, B63, B66, B69
Hair - E11, E13, E15
Leaves - G20, G05
Shading - W0, W01
Tonic Stencil -

Wednesday, January 26, 2022
Have A Ice Day - Penquin Shaker

Here's another Inky Stamper card. This is the last one as their guest designer. Thank you, Chelsea, for inviting me
For a wonderful opportunity, I'm honored. When I was coloring this penguin, I just had to make a shaker card since I had some fish, Sequins, why not. I also decided to use some snowflakes because we all have caught snowflakes on our tongues.
I wanted a different shape card. I used a circle die cut and cut only half of the circle.
Copics:
Penguin - C01, C01, C02, C03, C04, C06, YR00,
YR61, YR65
Igloo - C01, B61
Icicles - B61, B63
Ink for stamping:
Penguin - memento Black Tuxedo
Icicles - London Fog
Embellishments:
White Gel Pen
Diamond Stickles
https://inkystamperstore.com/penguin/
https://inkystamperstore.com/sequin-mix-icicles/
https://inkystamperstore.com/gems-polar-lights/
Tuesday, January 18, 2022
HB you Sly Fox

I have another card for Inky Stamper this week. We can't have enough masculine birthday cards on hand. I thought would be fun, if I could make the fox into a female. Just colored her purple, added some sparkle and some eyelashes. Wish you could see the sparkle on her tail. I used a blade to cut around his hand. Then I trim down her hand, to slide under his hand. When you're out with your gal, you want to hold her hand.
Supplies:
Copics:
Red Fox - E11, E13, E15, E18, BG70
Purple fox - V00, V01, V04
Boom box - C01, C03, C04, C06
Birthday hats - B000, B00, B01, B02, Y15, G05, YR65, R27, B26, G20, YG03, YG05, B95,
Noses - Nuvo Drops Black, Lilac Whisper
White gel pen
Momento Black Ink
Paper - Doodle Bug
Pop dots
Links to stamps sets used:
Sunday, January 16, 2022
2 Sasquatch cards

This stamp set is from Sweet Sentiment. What a great stamp set for a masculine birthday card. Just fun to color and create. The guy I made this for always tells his family he loves the color fuchsia. No one knows if he's joking or not, Lol.
Copics:
Sasquatch - face E000, E00, E11, R20, E13, E15, E18
Coffee pot & cup - RV00, RV02, RV04
Fire & Pit - W02, W04, B24, YR15, Y15, E23, E24
Die cut the grass in two shades of green.
Sky - Distress Oxides Savage patina and sketch blueprint
Slimline card

This one is done a little different. It's a slimline 8 5" x 3.5". I thought that this Sasquatch needed a brother. No reason for him to be lonely. Hanging out staying warm having some coffee. I cut out mountains by hand. Used copics to define them.
Copics:
Sasquatch - E30, E31, E33, E35, E11, E000, E00
Coffee pot and Cups - B21, B23 B24, R20, R22, R24, E25
Fire & Pit - W02, W04, B24, YR15, Y15, E23, E24
Diecut: 3 different layers for grass. Distress Oxide mowed lawn, on the grass Tips for dimension.
Distress Oxide: tumble glass, broken glass, blue print sketches
Used a white gel pen, white brilliance ink and white glitter embossing powder.
COPICS: CO, C01, C02, E04
Used pop dots behind his head, shoulders, and the coffee cup hand. I glued down the other hand and both feet. This gave the effect of the mountains to be miles away.
Link to stamp set:
Wednesday, January 12, 2022
Flamingo Flock Beaches

2nd week as a Guess Designer for Inky Stamper.When I saw this stamp set, this is what I imagined.Who's ready to take a break in winter? I know I am ready for the warm beaches. It's a girls weekend. These ladies are already partying, drinking Tequila Sunrises.
Copics:
Flamingos: RV00, RV02 Rv04, RV06
Palm Trees: E23, E25, G00, G002, G05, G09
Drinks: R49, YR68, Y15
Background: Distress Oxides
Orange Marmalade
Picked Raspberry
Kitsch Flamingo
For the bar, I cut a piece of white paper 1.75" x 5.5". Used my score board to score every 8th" . Cut a strip .25" x 5.5" to finish the bar. Used a cream paper and hand cut the sand, added a few dots in the sand. Used Distressed Oxide Tea Stain to edge the sand. Nuvo crystal drops for the bubbles.
Flamingo stamp set https://inkystamperstore.com/flamingo/
Saturday, January 8, 2022
My Sons Wedding Invitations

This is the designed I came up for my son and his fiance. I described what I wanted and Crackerbox Stamps are amazing to work with. Wendy loves dolphins and they plan on swimming with the dolphins 🐬 on their honeymoon.
I Stamped and heat emboss with silver Embossing powder. Then I fussy cut around the Dolphins to create the heart. Of course used a popdot to give a shadow underneath.
This Stamp was created by:
Crackerbox Stamps: https://www.crackerboxandsuzystamps.com/search/label/Snarky%20%26%20Funny%20Cards?m=1
Used Metallic Crystal, and Jupiter:
The band was cut 1.5" then we used the boarder punch from creative Memories:
https://www.creativememories.com/original-border-maker-system-bundle.html
The waves are discontinued.
The invitations were a accucut die
Wednesday, January 5, 2022
Fox Congratulations Card
This month I'm super excited to have been asked to be a guest designer for InkyStamper. This company loves puns. I often hear people are looking for ideas for masculine cards. I believe this card is a great card for many different occasions, birthday, encouragement, or just bc.


I used double-sided foam tape
I used 2 pennies and popdot between the pennies. You want to lay the penny down, to make sure your foam tape doesn't interfere with your movement. When using foam tape, I always use glue. Because it allows you a little extra time to place your card perfectly.
Copic colors:
Flags
Y11, Y13, Y15
R27, R25, R23, R22
B21, B24, B26, B28
BG 11, BG13, BG15, BG18
Fox
C0, C01, C02, C04, R20
Nuvo Drops:
Black
Crystal
Distressed Oxide: Salvaged Patina
Cut a strip of strip gray paper to ground the Silver fox. This little guy moves side to side and twirls around.
Sunday, January 2, 2022
Santa Christmas cards 2021
Santa's are full of Whimsy. They are digital from Joy Clare Stamps. For the bg I used Stamping Bella.


These are pictures of how I designed the front of the card. 1st time I've done this type of design. I used metallic white, silver, and navy papers.
COPICS:
Face - E11, E00, E000, R20
Suit - R27, R25, R22, R
Skates & Belt - C0, C01, C02, C04, C06
Beard - C0, C01, C02
Silver metallic pen for the skates and the belt buckle.
Pond - B000, B00, B01
Trees - G03, G05
Spectrum glitter pen
TOOLS:
Tree punch: discontinued
Wobble for the dancing: Santa: https://inkystamperstore.com/wobbles-mini/
Icicles Stickles
Embellishments: Picket purchased from Inky Stamper.
https://inkystamperstore.com/sequin-mix-icicles /https://inkystamperstore.com/sequin-mix-icicles/
I cut out a strip glued paper to Santa and to the pull strip. Bc I wanted to make it look like Santa was ice-skating.
Background - https://stampingbella.com/shop/index.php?route=product/product&path=18_155&product_id=10
Thursday, December 30, 2021
Martini Lady


This stamp reminds me of Holly Goes lightly, Breakfast at Tiffany's. Gold mirror paper and Metallic paper is always a beautiful combination choice.
Supplies needed:
Momento Black Ink
Versa mark ink
Embossing buddy
tape
Purple and lilac metallic papers
Gold mirror Paper
Gold Embossing powder
3" gold ribbon
1 glue dot
A2 Card with a window diecut out in the center. I have to apologize didn't realize this card kit isn't available.
Because metallic paper use your embossing buddy. Versa mark for wet embossing the gold embossing powder.
For the sentiment, I inserted the lilac paper and made tic marks on each side to make sure the stamp was placed correctly. (I use a mechanical pencil, it erases better than any pencil I have found).
I taped the mountain and valley to the inside tag. Which was included in the kit. I used a glue dot on the ribbon because I wanted the ribbon to lay flat.
links to the stamps:
https://rubberartstamps.com/martini-lady/
https://rubberartstamps.com/size-matters/
Thursday, December 16, 2021
Swinging Fairies

Night-time Swinging Fairies
I don't normally do silhouette stamps so this stamp was fun yet challenging.
Link to the Swinging Fairies
https://rubberartstamps.com/swinging-fairies/
I started out with ivory cardstock. I masked off for the moon. Used scattered straw and squeezed lemonade Distressed oxide for the glow around the moon. Then I applied more Distressed Oxides for the background, starting with the BluePrint Sketch. Next I'll be bringing in Faded Jeans. Last I used the Chipped Sapphire to finish up the edge. I used a white gel pen for highlights on the Fairies and stars. Used black and silver metallic cardstock.
Swing Fairies

Spellbinders circle dies 1 - 7.25" and 1 - 4" circle die. The large circle was scored in half. Which turns this card into a rocking card. I used Distressed Oxide ink, Chipped Sapphire around the edges of both circles.
Stamped with Versa-fine Black Oxide, then I used my heatgun to set the ink. Out lined with a white gel pen for highlights. Beautiful purple and silver Sequins.
A link to the Swinging Fairies Stamp
https://rubberartstamps.com/swinging-fairies/
Swinging Fairies
 I left the lights for this one. Maybe I added too much bling, 🤣 fairies love sparkly things. Mainly jewelry, like some people I know
.
 Isn't this a beautiful stamp? It's more beautiful in person. Had to make a night one. I used a flickering candle light to give it a beautiful glow.
 Playing with alcohol inks and vellum. I haven't created with alcohol inks in years. I forgot how much fun it was. Needless to say I'll be playing with them again soon.
 These are beautiful, they are the pearl alcohol inks. I use the color combination often. I love bold bright colors.
  I positioned the stamp with the positioner. Using the diecut cardstock to prevent from any mishaps.
  After the stamp is on the top before inking. You want to remove the cardstock. I Stamped directly on top of the alcohol inks. I wanted more vibrant colors not muted.
 If you would like to find the fairies
Thursday, December 9, 2021
Humorous Birthday Card


I'm excited to have been asked to be guest designer for Crackerbox Palace. Thank you Nadine and Vicky. I just thought making a scenic slimline card would be perfect. Thinking this will be a great birthday card for my grandson's 21st birthday in a few weeks.
Slimline cut the paper 7" x 8.5" score at 3.5" you should have an 3.5" x 8.5" uses a 10A envelope. You can use any 110# cardstock for a sturdy base for any card. Used diecuts (unknown) for the grass, #80 green cardstock.
Copics used:
Hyena
E11, E23, E25, E27, E30, E31, E33, E34
C0, C01, C02, C04, C06, C09
Eyes
YR27, Y17
Crystal nuvo drops
Sign
C0, CO1, C02
E11, E23, E25
Sentiment and Sky:
Distress Oxide - Salty Ocean
Links to images used:
https://rubberartstamps.com/psycho-hyena-critter/
https://rubberartstamps.com/psychopath/
https://rubberartstamps.com/psycho-saying/
Monday, November 22, 2021
Thanksgiving Pop up card 2021


Cardstock
White Base #110
Colored #60 Dark Olive Green and Orange and Yellow
Copics:
Turkey - E50, E51, E53, E55, E21, E23, E25, E27, E30, Y13, Y15, YR27, YR15, R29
Turkey Feathers- G05, R24, YR14, Y11
Apple - R23, R25, R27, R29
Leaves - Y13, R29, YR27, YR18,
Distress Oxide:
Tea Die wanted to give the edges more definition
Embossing folder Cuttlebug:
Is a food/kitchen
Embellishments :
pumpkin cookies Used 2 pumpkins, 2 cinnamon rolls, and a gold color disk
The stand up is a die-cut I used and it came with the dies for the layers. The pop-up part was cut at 2.75" x 5.5". 2nd layer was 1/8" off the length and width. The Happy Thanksgiving and sentiment was trimmed to size. As you can see just
Turkey - https://www.joyclair.com/products/thanks-digital-stamps
Sentiment - https://polkadotsandmore.com/
Sequins - are Pickett Fences, I bought them through InkyStamper - https://inkystamperstore.com/sequin-mix-pumpkin-cookies/
The Die set - Simon Says exclusive https://www.simonsaysstamp.com/product/Simon-Says-Stamp-3D-CARD-Wafer-Dies-sssd112376-Rainbows-sssd112376
Wednesday, November 17, 2021
Tiny Townie Blossom Loves Balloons


I created this card for my neighbor girl. What 16 year old doesn't want bling. I'm a big fan of Stamping Bella. They have a great variety of stamps. This one is from their Tiny Townie collections, Blossom loves Balloons. I color up images a head of time. Which helps me to put together a quick card. Especially when I have these card blanks. I always make them my own.
Copics used:
Blue: B20, B24, B26, B28
Yellow - Y11, Y13, Y15
Skin - E11, E000, E00, R20
Hair - E30, E31, E33
Distress Oxides:
Sky - Broken China
Mustard seed
Listed below are products I used to make this card.
Stamping Bella Stamp - https://stampingbella.com/shop/index.php?route=product/product&product_id=309&search=Balloon+
Used a stencil from Blue Knight Rubber Stamps - https://blueknightrubberstamps.com/cloud-stencil/
Sequins are Mermaid Water:
The card blank are papercuts, I purchased them: https://rubberartstamps.com/slider-die-cards-set-of-10-may/
Snarky Sentiment
Monday, November 8, 2021
Halloween Cards


Aren't these digital stamps priceless? I absolutely fell in love with witch she's beautiful. Then I found this little werewolf, which is perfect for the kids and males I make cards for. I love making Halloween cards. It's when all the kids get there own card. Not just 1 card for the family. Which makes them extra special.
The Witch from Sweet November Stamps can be found here: https://sweetnovemberstamps.com/collections/new-arrivals/products/digital-stamp-catwalk-witches-evilene
Copics:
Dress - V00, V01 V04, V05, V06
Owl - YR00, YR61, YR65, YR 68
Black - C0, C04, C06, C09
Sequins: pumpkin cookies 🍪 https://inkystamperstore.com/sequin-mix-pumpkin-cookies/
The diecuts are Katscrappiness, the fence, bats and tombstones - https://www.katscrappiness.com/collections/kat-scrappiness/products/crafters-essentials-halloween-dies-by-kat-scrappiness
I have to apologize bc I can't remember when I found the werewolf. 😕 I posted 2 different bg cards. The one with the flying witches, you can see the bats I attached onto acetate to make the bats interactive.
Copics for the Werewolf image:
Werewolf - E11, E13, E15
Shirt - FYG1, YG05. YG06
Jeans - B90, B93, B95
Bones - E50, E51
Tuesday, October 26, 2021
Marilyn Monroe Candle

I started with an oval shape tissue paper. Used Momento Black Ink. I Stamped several times because of the solid image. Then I placed the tissue on the candle. I wrapped waxpaper around the candle. To keep the tissue in place. Using my heat gun to melt the wax for the the tissue paper and the candle to melt together to become one. Keep you heat gun moving otherwise the candle will melt too much. Also take short breaks to allow the candle to cool down. Then of course I added some bling Close to my heart https://keeleyskreations.closetomyheart.com/retail/search.aspx?searchvalue=Bling
Wednesday, October 20, 2021
Procraftanator
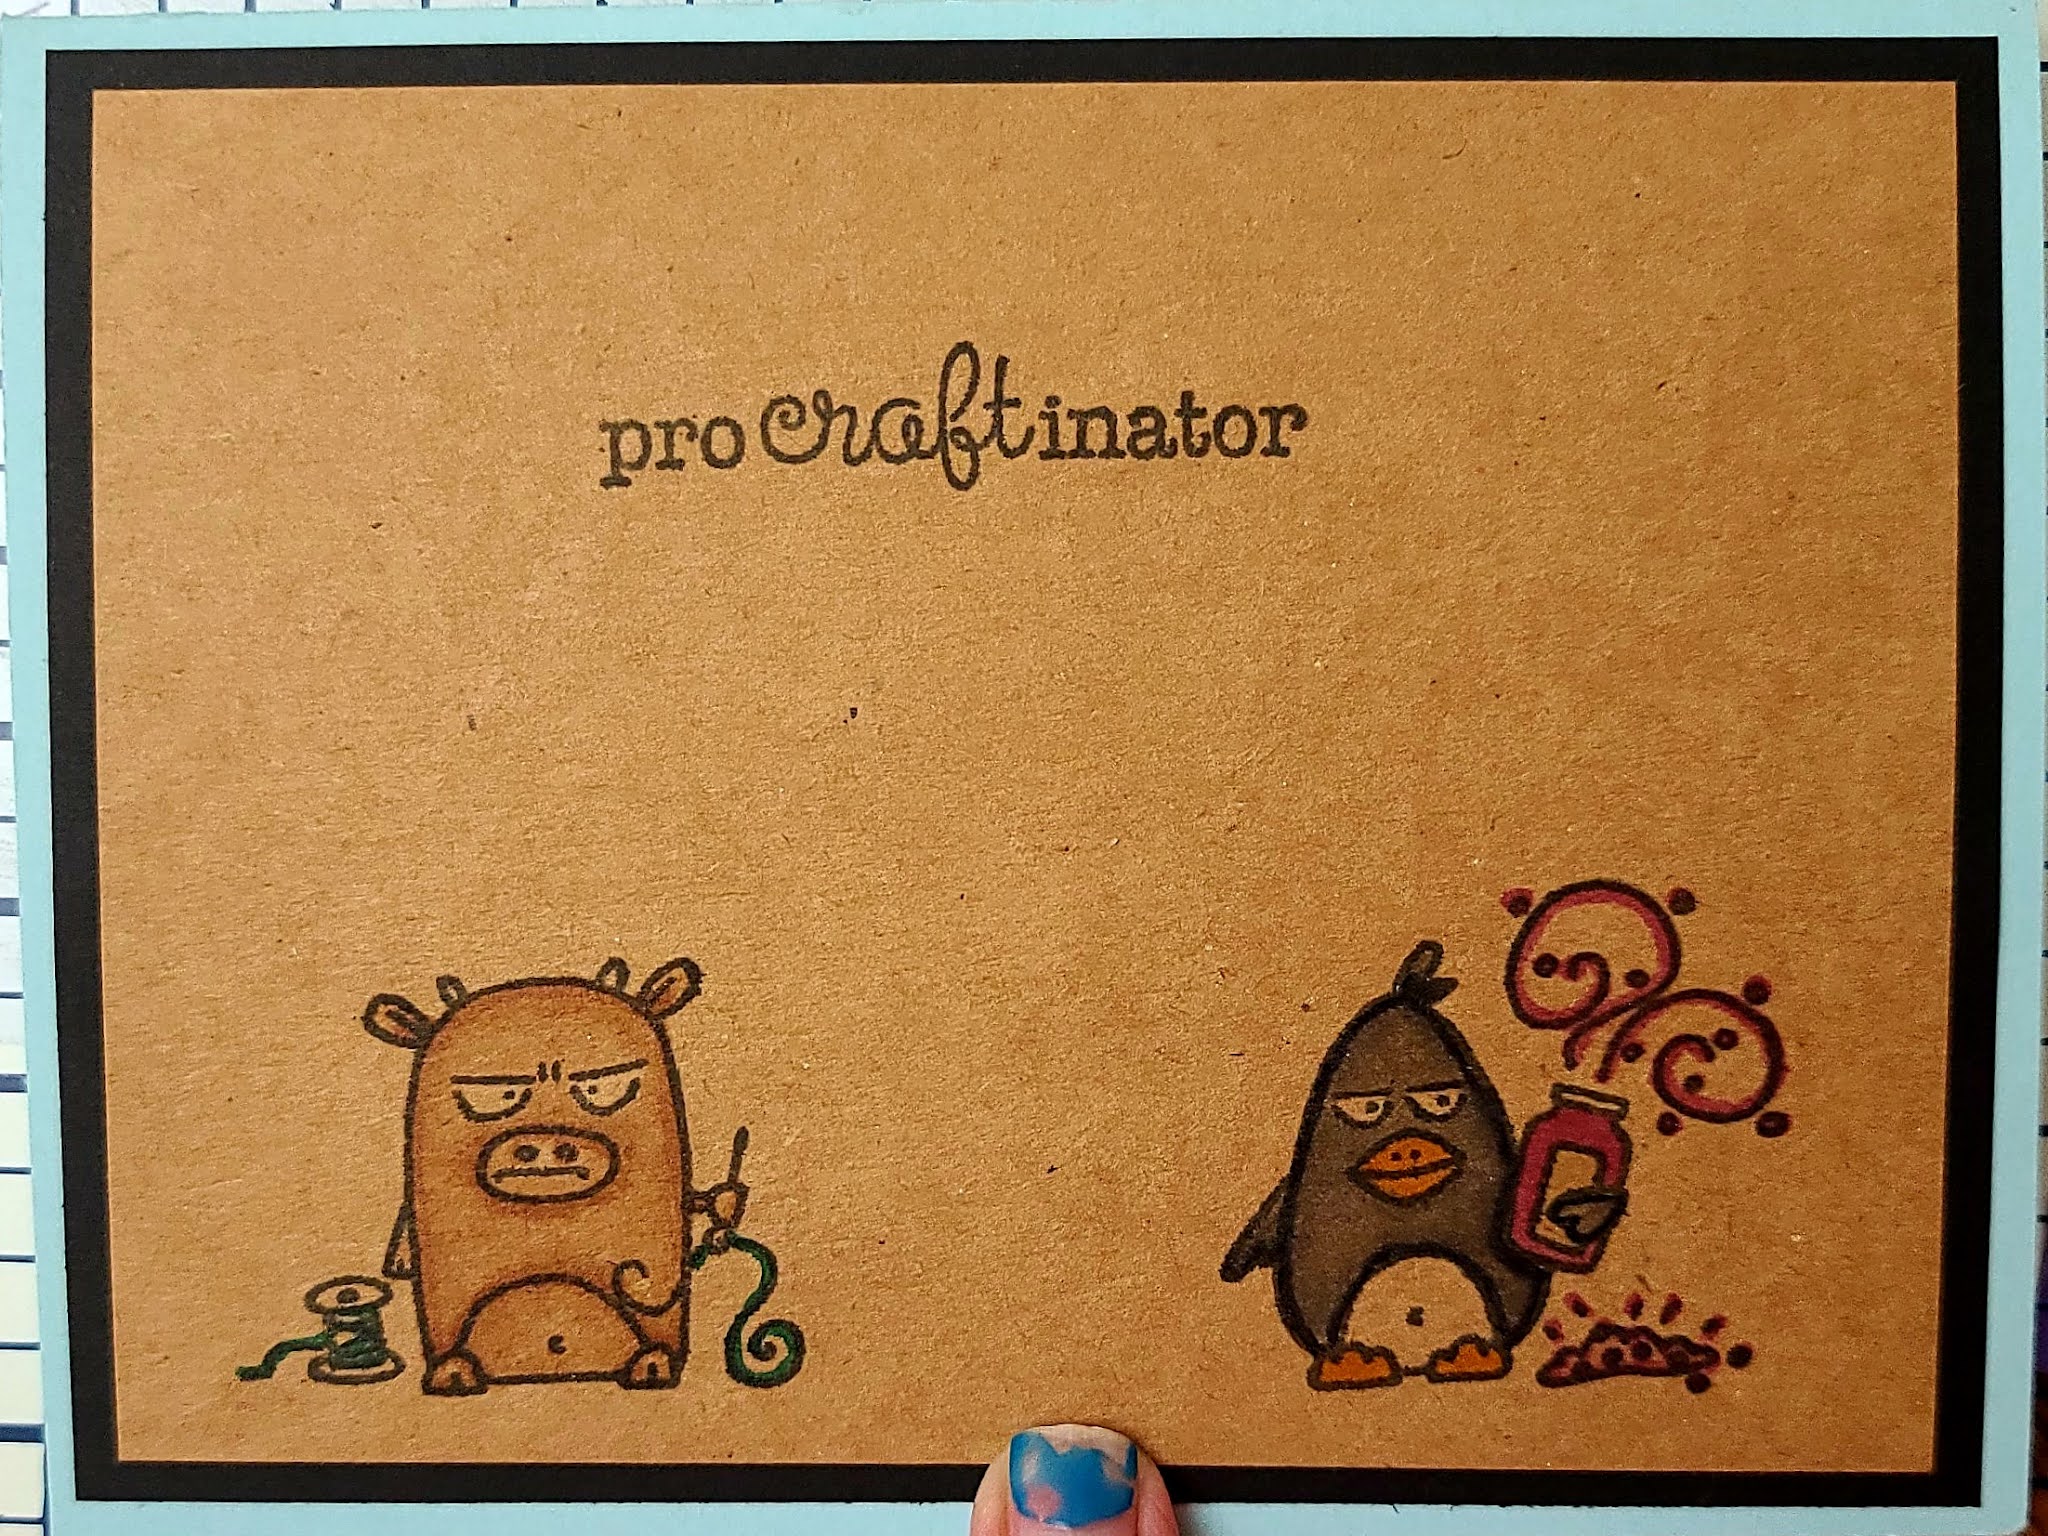

The Stamp set is Crafty Grumplings TE
Blue 100# Cardstock for A2 card
Black 80# Cardstock
Kraft cardstock with Stamped images and Sentiment.
White 100# Cardstock 8 1/4 × 4 scored at 4 1/8
Used Momento Black Ink
3 Stamped images to color
Colored with Copics
Bull E30, E33, G16
Penquin C06, C04, C03, YR15,
Label - YR15, Jar & Glitter V05, V01, Beek
& Feet - YR15
Rabbit - RV00, RV02, Brush & Paint - G16, E23
Tiger - YR61, YR68, C06
Squirrel - E27, E25, E23
Desk - B60, B68
Ribbon - RV02,
Books - RV02, & B66
Noses - C06
When Die cuting for the pop out use the larger one toward the outside and smaller in the middle. U will be using the larger one twice. Make sure you move the pop out part to be in place. Use your bone folder firmly to get all the folds nice and crisp. Then adhere one side of the of the white card stock to the blue then the otherwise.
Once you have colored your images, then u can fussy cut the the Rabbit, Tiger and Squirrel.
Now adhere the Critters to the popout. Then I fold my card and press down to make sure all images are secure. I have included several Sentiments. So u can choose one of ur liking.
Subscribe to:
Posts (Atom)